
This guide was first published on the earlier BTREE blog and presented at an IoT show. We have tidied it up and republished it here.
Blynk lets you control IoT hardware such as a NodeMCU from a smartphone app. By default, the app and the hardware talk through Blynk’s cloud. Running your own Blynk server on a Raspberry Pi keeps everything on your local network:
- your home automation keeps working even when the internet is down,
- your data stays in your home, and
- responses are faster, because commands do not travel to a cloud server and back.
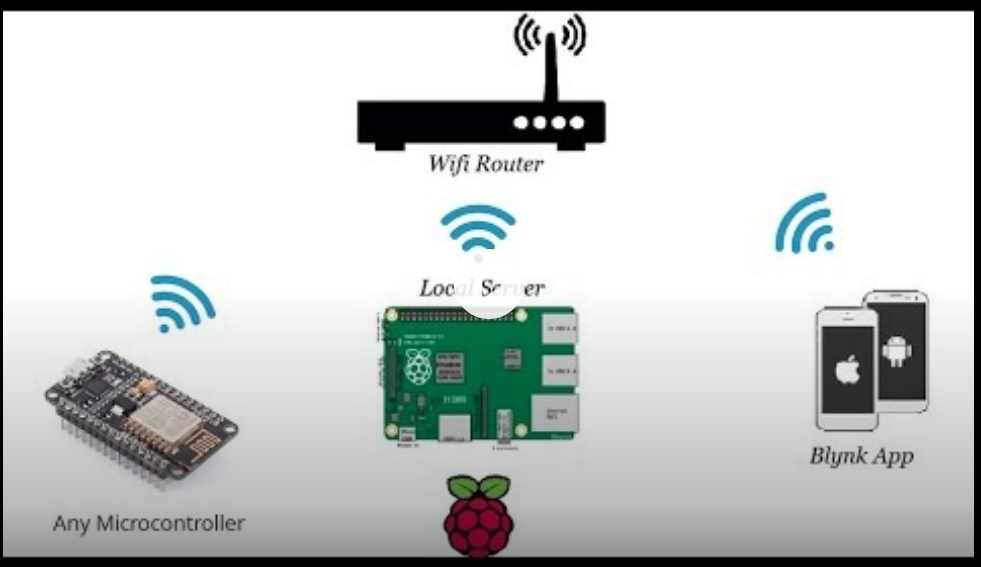
How it fits together
There are three parts, all connected to your Wi-Fi router:
- The hardware: any supported microcontroller, such as a NodeMCU, wired to relays and sensors.
- The local server: a Raspberry Pi running the Blynk server.
- The Blynk app: on an Android or iOS phone, where you build the control screen.
What this guide covers
- The basics of the Blynk architecture
- Setting up the Blynk app and its user interface on your phone
- Installing the Blynk server on a Raspberry Pi
- Uploading a Blynk program to the hardware (NodeMCU) from the Arduino IDE
Important: this guide uses the original open-source Blynk server (version 0.41.x) and the legacy Blynk app. Blynk has since moved to a new platform (Blynk IoT), and the legacy server is no longer developed. The steps still work for existing legacy setups and are useful for learning, but for a new project, check the current Blynk platform first.
Step 1: Prepare the Raspberry Pi
Install Raspberry Pi OS on an SD card using the official Raspberry Pi Imager, then boot the Pi and connect it to your network.
Step 2: Install Java and OpenSSL
The Blynk server is a Java application. The original guide used Oracle Java 8, which is no longer in the Raspberry Pi OS repositories. Install OpenJDK instead:
sudo apt update
sudo apt install default-jre openssl
Step 3: Download the server
# Create a working directory for the server
mkdir /home/pi/Blynk
cd /home/pi/Blynk

# Download the server
wget https://github.com/blynkkk/blynk-server/releases/download/v0.41.11/server-0.41.11.jar
Step 4: Create SSL certificates
The server comes with built-in certificates to make local installation simple, but do not use them where real security is needed. Generate your own self-signed certificate:
openssl req -x509 -nodes -days 1825 -newkey rsa:2048 -keyout server.key -out server.crt
openssl pkcs8 -topk8 -inform PEM -outform PEM -in server.key -out server.pem
Step 5: Configure the server
Create server.properties, using the default server.properties from the Blynk repository as a starting point:
nano server.propertiesPoint it to your certificate files:
server.ssl.cert=./server.crt
server.ssl.key=./server.pem
server.ssl.key.pass=YOUR_KEY_PASSWORD
Step 6: Set up email alerts (optional)
To let the server send email notifications, create mail.properties, starting from the default mail.properties:
mail.smtp.host=smtp.gmail.com
mail.smtp.port=587
mail.smtp.username=your-email@gmail.com
mail.smtp.password=YOUR_APP_PASSWORD
mail.smtp.connectiontimeout=30000
mail.smtp.timeout=120000
For Gmail, use an app password generated from your Google account (two-step verification must be on), never your normal password.
Step 7: Start the server
java -jar /home/pi/Blynk/server-0.41.11.jar -dataFolder /home/pi/Blynk -serverConfig /home/pi/Blynk/server.properties -mailConfig /home/pi/Blynk/mail.propertiesStart it automatically on boot
The original guide added the command above, ending with &, to /etc/rc.local before the exit line. On current Raspberry Pi OS, the cleaner way is a systemd service. Create /etc/systemd/system/blynk.service:
[Unit]
Description=Blynk local server
After=network-online.target

[Service]
User=pi
WorkingDirectory=/home/pi/Blynk
ExecStart=/usr/bin/java -jar /home/pi/Blynk/server-0.41.11.jar -dataFolder /home/pi/Blynk -serverConfig /home/pi/Blynk/server.properties -mailConfig /home/pi/Blynk/mail.properties
Restart=always

[Install]
WantedBy=multi-user.target
Then enable and start it:
sudo systemctl enable --now blynkStep 8: Give the Raspberry Pi a static IP address
The app and the hardware must always find the server at the same address, so the Pi needs a static private IP address. Choose an address that no other device uses and that is outside your router’s DHCP range.
On older Raspberry Pi OS (with dhcpcd): check that dhcpcd is running with sudo service dhcpcd status. If it is not, start and enable it:
sudo service dhcpcd start
sudo systemctl enable dhcpcd
Then edit /etc/dhcpcd.conf:
sudo nano /etc/dhcpcd.confAdd these lines. Use interface wlan0 for Wi-Fi or interface eth0 for a network cable, and replace the addresses with ones that match your network:
interface wlan0
static ip_address=192.168.2.102/24
static routers=192.168.2.1
static domain_name_servers=192.168.2.1
/24 is short for the subnet mask 255.255.255.0. The router address is usually both the gateway and the DNS server. Save with Ctrl + O, press Enter, exit with Ctrl + X, then restart:
sudo rebootOn Raspberry Pi OS Bookworm and newer, networking is managed by NetworkManager instead of dhcpcd. Set the static address with sudo nmtui (Edit a connection → IPv4 configuration → Manual), or reserve the address for the Pi in your router’s DHCP settings.
Check that the Pi answers at its new address:
ping 192.168.2.102Step 9: Check the server and open the admin panel
Check that the server is running:
ps aux | grep javaThen open the admin interface in a browser on the same network:
https://192.168.2.102:9443/adminYour browser will warn about the self-signed certificate. That is expected on a local server. Change the default admin password as soon as you log in.
Step 10: Connect the app and the hardware
- In the Blynk app, choose a custom server when logging in, and enter the Pi’s IP address and port.
- In your Arduino sketch for the NodeMCU, point Blynk to the local server, for example
Blynk.begin(auth, ssid, pass, IPAddress(192,168,2,102), 8080);, then upload it from the Arduino IDE.
Your phone now controls your devices through your own server, without depending on the cloud.
Need a reliable home or building automation system without the DIY work? BTREE designs and installs connected automation, safety and monitoring systems. Contact us to discuss your requirement.